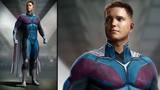
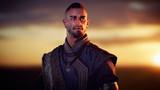


Learn how to create a realistic fantasy character model for animation in this in-depth tutorial covering all stages of the modeling process. Amy Ash takes you through how to creatively and technically create convincing characters, drawing on her 20-plus years of experience in the industry to help give you the tools to elevate your own projects.
This workshop is aimed at anyone looking to learn a professional and efficient way to create compelling and believable character assets. Basic software knowledge is advised, but every process is explained in detail, so artists of any level can follow along.
Amy will show you how to creatively interpret a concept, build a reference board, and create a blockout in ZBrush for locking down proportions. She’ll then detail how to create the rough head sculpt before moving into Marvelous Designer to create realistic clothing. Amy then heads back into Maya for the retopologizing work, and walks through the process of poly modeling all other parts of the character, before finally returning to ZBrush for the final refinements and detailing.
Along the way, Any shows you her tips and tricks for navigating various challenges and explains her philosophy for using story to inform the decisions she makes, sharing how this can elevate your own work. By completing this workshop, you will have a better understanding of the entire process of character modeling for cinematics, and how to work within an animation pipeline.
This workshop uses the Texturing.XYZ VFace pack and 3D Scan Store’s Female Base Mesh.
25 Lessons
This lesson emphasizes that proper analysis of a character brief is foundational to successful asset creation in a professional studio environment. By thoroughly reviewing all provided materials, asking clarifying questions, understanding the character's story and context, and identifying technical requirements early, artists can work more efficiently and align their creative decisions with project goals. The preparation phase is as important as the execution itself, setting up artists for success before they begin modeling.
Duration: 8m 21s

Reference gathering is a foundational skill for character artists that directly impacts the authenticity and quality of 3D assets. Amy states that by building comprehensive, real-world reference boards and continuously updating them throughout the project, artists can make informed decisions about materials, anatomy, and storytelling details. This preparation phase, while time-consuming, ultimately brings more realism and life to characters by grounding creative work in authentic visual details.
Duration: 5m 36s

Understanding the scale system within ZBrush is essential for efficient workflow and avoiding frustrating technical issues. While it may seem counterintuitive to work with 2-unit assets internally while targeting real-world dimensions, respecting this system ensures all ZBrush tools function optimally. By properly setting export scale values and maintaining correct proportions, artists can seamlessly integrate ZBrush into production pipelines while avoiding common problems like unexpected DynaMesh results, or improper brush behavior.
Duration: 8m 56s

Base meshes are fundamental tools in modern character production pipelines. They help to save time and maintain consistency across projects. Amy emphasizes that, while they increase efficiency for modeling, rigging, grooming, and texturing workflows, artists must take care to properly set up scale and symmetry from the beginning, as well as thoughtfully modify the base to avoid creating characters that look too similar. This workflow represents simple practices that benefit both studio and personal character development projects.
Duration: 7m 30s

This lesson demonstrates a practical workflow for blocking out character clothing and props in ZBrush using efficient extraction and remeshing techniques. The emphasis on creating clean base volumes rather than detailed sculpting at this stage reflects a production-oriented approach that prepares assets for further refinement in software like Marvelous Designer. Amy demonstrates a masking, extraction, and remeshing technique combined with strategic use of DynaMesh and Panel Loops. This approach offers a smooth process that can be applied to various hard-surface and organic elements on character models.
Duration: 23m 2s

This lesson showcases an efficient workflow for creating character armor in ZBrush using fundamental modeling techniques. Amy emphasizes the importance of working in context and not being too precious with early blockout work, since everything will be refined later. By leveraging tools like ZRemesher, Polygroups, and smart duplication of elements, complex armor pieces can be built systematically while maintaining flexibility for future refinement.
Duration: 7m 15s

The fundamental lesson here is that successful head sculpting relies on establishing proper anatomical foundations before adding detail. Amy shares that there are no shortcuts to developing an understanding of facial anatomy besides regular practice, such as doing timed sculpts of varied subjects. By focusing on major forms, maintaining flexibility through low-resolution meshes, and constantly viewing the sculpt from multiple angles, artists can avoid common mistakes and create more convincing characters.
Duration: 4m 55s

This lesson emphasizes a methodical approach to head sculpting that prioritizes anatomical accuracy and proper workflow over premature detail work. By establishing correct proportions and secondary forms first, then leaving fine surface details for texture projection later, Amy creates a solid foundation for a realistic character model. The key lesson is to maintain a balanced, iterative approach that considers the entire model rather than getting lost in perfecting individual features too early in the process.
Duration: 2m 28s

This lesson demonstrates how subtle adjustments to proportions and silhouette can dramatically improve a character's visual appeal and balance. By systematically addressing issues with the torso shape, armor proportions, and costume elements, Amy transforms a stiff, boxy initial model into a more dynamic, aesthetically pleasing design. The careful comparison process and attention to viewing angles exemplify the importance of critical evaluation during the early stages of character development, setting a strong foundation for subsequent modeling and cloth simulation work.
Duration: 19m 23s

This lesson presents an efficient professional workflow for transferring detailed sculpts to base meshes using Wrap3D, dramatically reducing time compared to manual methods. The key to success lies in proper preparation (Polygroups and rough alignment) and in understanding how to handle problematic areas, such as eye sockets and mouth bags, that require special treatment. While the automated process is powerful, minor cleanup in ZBrush is still necessary. The overall time savings and quality, however, make Wrap3D an industry-standard choice for professional character work.
Duration: 12m

This preparation workflow is essential for successful cloth simulation in Marvelous Designer. By creating clean, quad-based topology with properly unwrapped UVs and consistent texel density, Amy ensures that clothing patterns will extract correctly and simulate realistically. Though this mesh won't be the final version of the topology, following best practices at this stage provides a solid foundation for later remeshing and detail work.
Duration: 5m 33s

This lesson provides a comprehensive foundation for setting up cloth simulation in Marvelous Designer by demonstrating proper import workflows, pattern cleanup, and layering management. Amy emphasizes working iteratively with low-resolution simulations first, then refining details once the basic structure is stable. With the major garment pieces now in place, the next phase will focus on detailing, adding armor pieces, and straps to complete the costume design.
Duration: 32m 41s

This lesson showcases the iterative, detail-oriented workflow required for professional character clothing design in Marvelous Designer. Amy demonstrates that successful digital garment creation requires understanding both the software's technical tools and real-world garment construction principles, particularly regarding how seam angles and pattern shapes affect fabric behavior. The emphasis on capturing cloth and armor interaction rather than final armor detail reflects an efficient pipeline where different software handles different aspects of the final asset, with Marvelous Designer excelling at realistic fabric simulation.
Duration: 43m 1s

This lesson illustrates a pragmatic workflow for creating realistic clothing assets by leveraging the strengths of different software packages. Amy demonstrates that expertise in Marvelous Designer isn't required to achieve professional results. Knowing when to push forward, when to compromise, and when to switch back to ZBrush is equally valuable. The emphasis on efficiency and practical problem-solving over technical perfection makes this approach accessible while still producing high-quality, realistic cloth simulation for character design.
Duration: 32m 36s

This lesson emphasizes the importance of critical review and iteration in the 3D character creation process. By systematically identifying problems, testing solutions in multiple ways, and combining the best results, Amy demonstrates that professional-level refinement requires patience and a willingness to rework elements until they meet both the concept and technical requirements. The model is now ready to proceed to the retopology phase with most major design and simulation issues resolved.
Duration: 12m 46s

This lesson demonstrates an efficient method for converting Marvelous Designer cloth simulations into animation-ready topology. By retopologizing on flattened geometry and using blendshapes to wrap the flat piece onto the 3D form, artists can create clean, quad-based meshes that meet the technical requirements for character animation. The emphasis on maintaining quads, even distribution, and proper edge flow ensures the final garments will deform properly during rigging while providing sufficient detail for subdivision and displacement workflows in production.
Duration: 28m 17s

This lesson demonstrates professional techniques for finalizing cloth geometry in Maya, emphasizing the balance between mesh resolution, realistic detail, and pipeline efficiency. The seam-stitching workflow with UV preservation is particularly valuable for maintaining clean texture maps while creating continuous meshes. These methods prepare the model for rigging or further CFX simulation, allowing artists to produce both high-resolution renderable meshes and lower-resolution meshes oriented for speed for animation, and based on studio requirements.
Duration: 14m 24s

This lesson emphasizes the technical precision required for creating realistic cloth simulation in 3D character modeling. The key takeaway is that proper topology planning, such as ensuring matching edge loops between layered elements, is essential for preventing mesh artifacts during animation. The instructor's demonstration of alternative workflows when encountering software crashes highlights the importance of flexibility and having multiple problem-solving approaches in complex 3D production pipelines.
Duration: 23m 50s

This comprehensive poly-modeling workflow demonstrates that successful character asset creation requires both technical proficiency and artistic judgment. Amy emphasizes building clean, production-ready topology that supports both subdivision rendering and sculpting workflows while maintaining efficiency. By focusing on proper edge flow, consistent density, and thoughtful construction that mirrors real-world garment assembly, artists can create assets that deform well during animation and provide a solid foundation for detailed sculpting and texturing passes.
Duration: 28m 51s

This lesson demonstrates a professional workflow for creating game-ready armor that balances artistic design with technical efficiency. Amy emphasizes that successful 3D character armor requires understanding both historical construction methods and modern topology techniques, while maintaining flexibility for inevitable design changes throughout production. By breaking the detail work into appropriate stages (modeling, sculpting, texturing) and solving topology challenges methodically, artists can create authentic-looking armor that's both visually appealing and production-ready.
Duration: 42m 50s

This lesson presents a powerful, non-destructive workflow for creating detailed metallic elements in ZBrush. By combining tools like Live Boolean, Array Mesh, Radial Symmetry, and DynaMesh, artists can efficiently build complex ornamental pieces while maintaining the flexibility to make design adjustments at any stage. This approach balances artistic freedom with technical efficiency, making it ideal for creating intricate game or film assets that require both visual detail and a practical workflow.
Duration: 15m 31s

This lesson emphasizes a methodical approach to sculpting leather that prioritizes proper setup, underlying forms, and material-appropriate deformation over premature surface detailing. The instructor demonstrates that convincing leather should look like leather through its folding and buckling behavior before any grain texture is applied, and that working loosely, while being willing to revise, allows for more creative exploration and better final results. This first sculpting pass establishes the foundation that will be enhanced further through texturing in later stages of the character creation process.
Duration: 46m

This comprehensive sculpting workflow demonstrates the balance between technical efficiency and artistic refinement in character asset creation. Amy emphasizes understanding real-world material behavior and manufacturing methods to create convincing digital surfaces, while maintaining a practical approach by saving surface-level details, like staining and fine scratches, for the texturing phase. The methodology of working in multiple passes with non-destructive techniques ensures flexibility for inevitable revisions while strategically building detail where it will have the most visual impact.
Duration: 24m 14s

This lesson emphasizes that successful character head sculpting requires both strong anatomical knowledge and technical proficiency with modern workflows. Amy demonstrates that, while displacement maps provide realistic skin detail efficiently, the underlying sculptural forms, proper topology, and attention to areas like ears and necks are what ultimately make or break a professional-quality character asset. The repeated emphasis on observation over assumption, combined with an understanding of production constraints around rigging and asymmetry, reflects real-world studio practices in which quality and efficiency must be balanced.
Duration: 22m 48s

The final lesson emphasizes the importance of stepping away from your work and reviewing it with fresh eyes to catch issues, as well as using appropriate rendering software to reveal problems that may be invisible in sculpting previews. Amy demonstrates that the final polish involves not only artistic refinement but also technical professionalism in terms of file organization and topology. While acknowledging that no asset is ever perfect – and knowing when to move forward is crucial – Amy focuses on achieving natural cloth simulation, cohesive design, and elevated interpretation of the original concept art.
Duration: 12m 40s

Primary tools
For this workshop you’ll need:
* Note that these programs and materials will not be supplied with the course.
Skills Covered
Who’s this Workshop for?
This workshop is designed for 3D artists and character modelers seeking to master professional character creation workflows. Whether you're a beginner with basic software knowledge or an intermediate artist looking to refine your skills, Amy Ash's detailed explanations make the complex modeling process accessible to all levels.
Game developers, animation studios professionals, and freelance artists will particularly benefit from learning industry-standard techniques spanning multiple software packages. Students and anyone beginning a career-change journey will gain valuable insight into real production pipelines, while experienced artists can discover new approaches to storytelling through character design and efficient modeling workflows.
Learning Outcomes
By completing this workshop, artists will have mastered the complete professional pipeline for creating realistic fantasy characters suitable for animation and cinematic production.
Key skills include:
- How to creatively interpret concept art and build comprehensive reference boards for character development.
- How to create effective blockouts in ZBrush for establishing accurate proportions and anatomy.
- How to sculpt detailed and convincing head geometry using professional techniques and workflows.
- How to design and simulate realistic clothing and fabric using Marvelous Designer software.
- How to perform clean retopology work in Maya for animation-ready mesh topology.
- How to integrate story elements and narrative thinking into technical character modeling decisions.
- How to navigate between multiple software packages efficiently within a production pipeline environment.
- How to apply final refinements and surface details in ZBrush for cinematic quality results.


