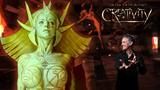
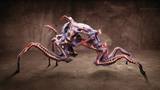
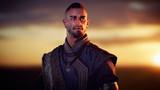

Creating original creature designs using characteristics from real-world animals adds a dash of realism and familiarity to your concepts. This workshop by Kurtis Dawe, Character Artist and Modeler at Scanline VFX in Vancouver, shows a complete workflow for creating a unique Viper Dragon concept in 3D, from reference gathering through to the final Photoshop composite.
With a project like this, reference is key. Kurtis shares how he searches for and explores references that will help him hone in on the look and feel of the character he’s creating, before fleshing the creature out in 3D using ZBrush. From there, Kurtis’ workflow covers his retopology work in ZBrush, reveals his UV-ing process in Maya, and walks through the texturing and shading processes in Mari. With the character textured, he then demonstrates his techniques for posing the creature using Transpose Master in ZBrush, before tackling the lighting and rendering with the KeyShot renderer. As the final step of the process, Kurtis shares his compositing techniques using Photoshop, to pull together a final illustration suitable for a client or portfolio.
Throughout the workshop, Kurtis shares industry tips and tricks along the way to help viewers fully understand the nature of creature design and modeling in the entertainment industry, with his goal to always teach how to get the absolute best out of your sculpts. The process shared is the same workflow that he personally uses to make hero characters for feature films, making this workshop a must-watch for creature modelers and concept artists either working in feature film and production or aspiring to.
*The Dragon scale VDM brush packs featured in Chapter 8 can be found on the ArtStation marketplace: Pack 1 is available here, and Pack 2 is available here.
17 Lessons
Kurtis starts off his creature design workshop by collecting extensive real world references, rather than relying purely on imagination. He stresses that by studying real-world animal anatomy, skulls, scales, eyes, and other features, artists can create fantastical creatures that remain grounded in reality, making them more believable and emotionally impactful. Approaching creature design in this way allows artists to create something fantastical while maintaining anatomical credibility that resonates with viewers.
Duration: 8m 56s

Getting started in ZBrush, Kurtis begins blocking out the general shape of his creature, paying close attention to reference as he moves along. Kurtis shares the importance of using proper topology from the beginning, concentrating on detail only where needed, and testing functionality of interlocking parts (like the creature's jaw) early on in the process. Once the proper flow of major details is established, he sends the model over to Maya to fully retopologize it for further use in ZBrush. He also encourages exploration and "happy accidents" when they occur during the sculpting process which allows artists to freely discover unique design features.
Duration: 46m 45s

In this lesson, Kurtis wraps up some more sculpting and refinement, still testing new and existing features and forming new ideas before jumping back to Maya to set up the creature's UVs. He shows that by properly managing topology, UVs, and detail projection between software packages at this point, artists can create an efficient pipeline that will facilitate the texturing phase later on, while maintaining creative flexibility throughout the sculpting process.
Duration: 21m 17s

In this lesson, Kurtis refines his creature in ZBrush by adding distinct details using masking techniques and layers, introducing newly referenced elements and believable weight to the design. He emphasizes strengthening the anatomical foundation before addressing surface detail. The lesson then moves into the next pipeline stage, as Kurtis exports the model to prepare textures and displacement maps in Mari.
Duration: 26m 15s

Now in Mari, Kurtis shows his set up and method for getting high quality displacement maps down onto the model. Along the way, he explains why proper preparation and workflow organization are essential for professional creature texturing results. While the process of transferring between Maya, Mari, and ZBrush can be time-consuming, taking the time to fix UV issues and properly layer textures prevents significant problems later in production. Once the model is all settled, Kurtis takes advantage of quality premade maps from Texture XYZ, in order to manually layout scales for his creature in Mari.
Duration: 27m 3s

In this lesson, Kurtis works to blend and refine the initial displacement map layout in Mari, working to create a realistic reptilian skin texture for his creature before moving to ZBrush. He emphasises proper scale directionality, flow, and size variation. By taking advantage of tiled textures with strategic masking and warping, Kurtis shows you how to achieve natural-looking results that serve as a solid foundation for further displacement-based detailing.
Duration: 18m 26s

Back in ZBrush, Kurtis goes over how to separate and group his creature model by its UVs in ZBrush in order to prepare it for the displacement maps he made in Mari. Utilizing layers and morph targets, he isolates and cleanly applies the appropriate texture per section, dialing it in with manual brushing. Once complete, he begins varying the detail by hand, while maintaining the natural flow of patterns which follow the underlying form of the creature.
Duration: 28m 21s

Now that the creature model has an initial texture pass laid out, Kurtis demonstrates the use of one of his custom made VDM brushes in ZBrush, and how they can push the scaly texture of this creature to the next level. Though this is a manual process, the brush's ability to drop in multiple types of quality overlapping scales allows the artist to have full control of variation and direction of each scale, producing significantly better results in the texture.
Duration: 24m 13s

Kurtis continues to add detail to the creature design, still taking advantage of his VDM Brushes, while further refining details with hand sculpting techniques. At this point, Kurtis’s main concern lies more with achieving a compelling final render for concept work rather than production-ready topology. Finishing up this lesson, Kurtis shows us how to leverage alphas and other unique brushes in ZBrush to add convincing organic detail quickly.
Duration: 24m 38s

In this lesson, Kurtis walks through creating the eye for his creature in Maya, including multiple layers of geometry that will help to sell realism later on, and UVs which he uses to layout complex texture quickly in Photoshop. In ZBrush, the model and textures are brought in so that he can then focus on sculptural details. The eyes are critical for bringing life and character to any of your creature designs, and investing time in creating detailed, contrasting textures with subtle geometric detail pays dividends in the final result.
Duration: 37m 55s

In this lesson, Kurtis hops back into Mari to further texture and paint his creature model, using more assets from Texture XYZ and other sources. Taking these samples into Photoshop he creates tileable base textures for major areas, while leveraging displacement data from ZBrush to enhance and better guide his painting. This workflow enables artists to successfully produce detailed, organic-looking skin textures suitable for concept art and visualization purposes.
Duration: 36m 36s

In this lesson, Kurtis tackles the teeth of his creature. To do this, he takes advantage of tileable textures and maps baked out of ZBrush to get a lot of detail down really quickly. This workflow is particularly valuable for concept artists who need to produce convincing results fast, and goes to show that strategic use of procedural processes and technical preparation can significantly reduce texturing time while maintaining quality.
Duration: 19m 59s

Kurtis wraps up his texture work on the teeth and follows a similar approach for the creature's tongue, once again making use of ZBrush, Mari and Photoshop for his texturing needs. Along the way there's some trial and error, and some technical problem solving that results in a complex and convincing result for the tongue. With this texture work complete, the model is ready for posing and rendering.
Duration: 15m 46s

Before getting to the pose, Kurtis jumps back over to Maya in order to place all of the creature's UV tiles onto the same UDIM. He then transfers these changes to his working model; an important step that enables him to work with his renderer of choice, Keyshot. Next, Kurtis poses the creature in ZBrush using the built-in Transpose Master plug-in, while keeping in mind that there is a point where good enough is ok within a production pipeline.
Duration: 19m 9s

In this lesson, Kurtis moves into rendering his creature model, exporting high resolution texture maps from ZBrush for use in Keyshot. Using some simple edits in Photoshop, he can quickly add in some additional skin detail to the creature, as well as convert his color diffuse map into a new specular map. Once in Keyshot, Kurtis walks through his process pipeline for applying realistic materials with his textures to the creature, before carefully lighting and rendering the model.
Duration: 27m 55s

Happy with his render set up, Kurtis goes back to ZBrush to add some simple yet effective liquid details, like drool, to add to the realism in his final scene. For creating these accent pieces, he doesn't worry much about the resulting typology, just that it fits the model well, and the correct glassy material is placed on them, again making the creature feel more life-like. Happy with the result, Kurtis explains how to render out different passes for composting in the final image in Photoshop.
Duration: 16m 55s

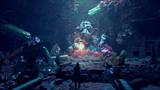
In this final lesson, Kurtis provides us with a comprehensive look at his composting workflow, demonstrating how to utilize multiple render passes and photographic elements to create a polished final piece. By painting and masking these passes, he is able to maintain full control over the material elements in the piece. At the same time, he uses layer filtering and additional color paintover to successfully unify the creature model, the background, and supplementary foreground layers into one complete production worthy composition.
Duration: 24m 18s

Primary tools
For this workshop you’ll need:
Project Files
When you download the project file with this workshop, you'll get access to Kurtis Dawe's unique ZBrush user interface. His UI presents all the common tools you'll need to produce quality sculptures quickly:
- Custom ZBrush UI: Kurtis's commonly used ZBrush functions, which will save you time searching for tools, allowing you to focus on sculpting –
Skills Covered
Who’s this Workshop for?
This workshop is designed for intermediate to advanced 3D artists, character modelers, and creature designers working in or aspiring to enter the entertainment industry. Those with foundational knowledge of ZBrush, Maya, and digital sculpting will gain the most from Kurtis's professional workflow.
Concept artists looking to expand into 3D, film industry professionals seeking creature design expertise, and students interested in the digital sculpting craft will also benefit significantly from these lessons. The industry-standard techniques and real-world workflow insights provide valuable knowledge for building compelling portfolio pieces and understanding feature film expectations.
Learning Outcomes
In completing this workshop, artists will have grown their skills as professional creature designers, gaining key insights into the pipeline used in feature film production.
Key skills include:
- How to gather and utilize reference materials effectively for realistic creature concept development.
- How to sculpt detailed organic creatures in ZBrush using professional modeling techniques and workflows.
- How to perform efficient retopology and UV mapping for production-ready character assets in Maya.
- How to effectively work between multiple programs in a pipeline-based workflow.
- How to texture and shade creatures professionally using Mari for photorealistic surface details.
- How to pose characters dynamically using Transpose Master in ZBrush for compelling presentation and storytelling.
- How to light and render creatures effectively in KeyShot for professional portfolio presentation.
- How to composite final illustrations in Photoshop for client-ready concept art and portfolio pieces.


