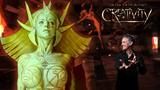


Dive into the captivating world of 3D matte painting and master the art of crafting breathtaking environments using advanced techniques and industry-standard software. This workshop is designed for aspiring and intermediate artists seeking to elevate their 3D matte painting skills. Prior experience with digital art software like Photoshop, Nuke, and 3D software, such as Blender, is highly recommended.
In this intermediate-level workshop, students will learn how to seamlessly blend 2D and 3D elements, create realistic landscapes, and design atmospheric environments. Essential tools and functions such as camera projection, 3D modeling, texture painting, and image compositing will all be covered in-depth.
This comprehensive workshop provides invaluable insights into the professional matte painting industry, including workflow optimization, collaboration tips, and techniques to meet client expectations efficiently. By completing this workshop, students can confidently conceptualize, plan, and execute a full 3D matte painting project independently. You will hone your skills in creating realistic terrains, integrating 3D assets seamlessly, and achieving photorealistic results through effective lighting and shading techniques.
Downloadable files provided with this workshop include everything students need to follow along with Koke’s process.
Thanks go to Dario G. Reina for their help compositing in the early stages of the workshop; RDNE Stock Project for their free stock video, which Koke used as a plate in the workshop; KitBash3D for its free Mission to Minerva 3D kit; and mattepaint.com for the 2D assets used in this workshop.
17 Lessons
In this workshop Koke explains that modern matte painting is a complex, multi-disciplinary art form that goes far beyond simple photo editing. Success requires mastering both traditional artistic fundamentals and multiple software packages, while working collaboratively across multiple CG departments.
Duration: 42m 45s

In this lesson, Koke provides us with an example of a brief which describes the type of scene the client is looking to have matte painted. Before getting started, Koke talks about how to gather good references, pooling them in PureRef so that artists can make more informed and consistent design decisions. Then, he looks at useful places where quality 2D and 3D assets can be pulled from.
Duration: 24m 24s

In this lesson, Koke moves into the layout phase, establishing the critical building blocks that the entire matte painting project will be based on. Starting in Nuke, he covers software basics, setting up the initial scene and importing his project assets, such as plates, cameras, roto masks, and reference geometry. Koke keeps things organized and works with low resolution proxies, to assist in the layout process, rather than worrying about anything detailed at this point.
Duration: 37m 44s

In this part of the layout phase, Koke jumps into Blender. Still using placeholder geometry, the instructor shows how artists can confirm their composition choices, real-life scale, and camera movement decisions before committing to resource-intensive final assets. This professional approach prevents costly revisions later in production and establishes a solid foundation for adding detailed Kitbash 3D assets, refined terrain, and final materials later on.
Duration: 29m 55s

To finish off the layout process, Koke adds in simple primitives to design the settlement he plans to add to his scene. He applies different materials to each piece of geometry, to help distinguish each part of the set up, before beginning to develop the lighting he wants to have in the scene. He then renders out this set up, porting it over to Nuke so he can keep building upon his composition, and adding more 2D elements.
Duration: 47m 38s

In this lesson, Koke introduces us to World Creator, taking it step by step for beginners new to terrain generation. A key part of his process is examining his references in PureRef in order to recreate the type of terrain the brief calls for. Utilizing different filters that stack with each other, Koke dials in the look, feel and placement of terrain features until he's ready to apply textures.
Duration: 35m 55s

Evaluating the terrain from the last lesson, Koke looks at some of the materials that World Creator has to offer in their online library, in order to get texture on his landscape. Layering these textures, using masks to separate different features based on height and other natural phenomena, the instructor is able to create a complex set of texture maps ready for use in Blender.
Duration: 12m 56s

In this lesson, Koke starts off by showing a useful plug-in that enables artists to quickly export directly from World Creator to Blender. Although this export comes with the terrain fully textured, Koke recreates this shader by hand using textures from Quixel Megascans for better results. Once complete, he jumps back to World Creator, showcasing the power of random instancing that can utilize his established settings, and eliminate any chance of repetition in his scene.
Duration: 29m 34s

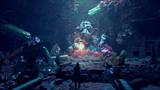
In this lesson, Koke generates more terrain variations for his scene, eliminating mountains and adding craters. Back in Blender, he lays out these variations within the camera perspective, ensuring that there are no repeating forms. With all of these elements complete, he moves on to preparing his main foreground elements and the sci-fi settlement in shot.
Duration: 28m 52s

In this lesson, Koke demonstrates his process for downloading and constructing the sci-fi settlement for his scene, utilizing assets from KitBash 3D. In order to maintain a flexible and optimized workflow, he ensures that his elements are created as instances before he starts to freely combine them. Happy with his final layout for the settlement, he makes some final touches to their textures and lighting corrections.
Duration: 32m 37s

In this lesson, Koke talks about changes he’s made to the terrain texture to make it appear even more believable, showcasing a much more complex material graph. He also creates groups with subsections for the foreground, middleground and background in preparation to render the scene. With these in place, he can set up different render passes that will help greatly when transferring to Nuke.
Duration: 37m 34s

In this lesson, Koke exports all assets and renders from Blender to Nuke. To do this, Koke demonstrates his process for converting geometry renders in Blender, into simplified versions in Nuke as projections considering the camera perspective and movement. This allows artists to maintain visual fidelity while avoiding performance bottlenecks.
Duration: 29m 9s

In this lesson, Koke continues to prepare his scene for render, beginning texture projection in the middle ground section. As this area is closer to the camera, we require some more detail, so Koke shows how to export low poly versions of these assets into Nuke, with the goal of projecting the captured render on top. He does this using 2D cards as well, achieving convincing parallax and depth without the need for fully modeled 3D scenes. This approach balances visual quality with production efficiency.
Duration: 29m 1s

In Nuke, Koke composes most of his scenes from Blender. Utilizing the projections he's created in previous lessons, he is able to now lay out everything from foreground to background. Keeping organization in mind for his Nuke Graph, he is able to produce the base for a successful matte patting scene, ready for full compositing work.
Duration: 30m 48s

In this lesson, Koke points to Mattepaint.com, where a lot of quality assets can be found, though, in this instance, he needs a dynamic sky HDRI to help finish his scene. After some adjustments, using a combination of Photoshop editing, Nuke layering, clamping values, and adding subtle atmospheric layers, Koke is able to create a convincing integrated environment setup that blends CG and photographic elements.
Duration: 21m 40s

In this lesson, Koke enters the final stages, demonstrating techniques for modifying the sky from earlier and creating his own HDRI. He also shows how artists can introduce subtle planes of atmosphere and other details on each level of the composition in Nuke using more 2D planes. These skills and problem-solving approaches are essential for working in VFX studios.
Duration: 44m 8s

This last lesson covers the final bits of polish Koke plans to add to the scene in order to really bring all of the layers in the composition together. Techniques he uses include texture painting in Photoshop, to enhance details closest to the foreground camera, over all color corrections for the whole composition in Nuke, and cropping the scene in the final render to something more cinematic. To wrap up, Koke goes over the settings to render the shot out of Nuke.
Duration: 41m

Primary tools
For this workshop you’ll need:
* Note that these programs and materials will not be supplied with the course.
Project Files
The provided files will give you access to a comprehensive package containing everything you'll need to follow along with Koke Nunez on this project. With these files, you'll find:
- Master Blender scenes – Complete project files, including the main scene and terrain generation setups, you can open and explore
- High-resolution EXR sequences - Render passes and height maps (including 8K height maps) used in the pipeline for compositing and terrain generation
- 3D geometry assets - FBX and OBJ models of terrain assets used in the workshop, ready for you to use in a wide variety of programs
- Nuke compositing files - The professional node setup used for post-processing and final render compositing, made available for you to explore
Skills Covered
Who’s this Workshop for?
This workshop is specifically for aspiring and intermediate digital artists looking to advance their 3D matte painting expertise. Artists with prior experience in Photoshop, Nuke, and 3D software like Blender will find the comprehensive techniques in these lessons useful for developing their environment art skills.
Concept artists, VFX artists, and environment artists seeking to expand their technical toolkit will also gain key industry insights from Koke Nunez’s process. The workshop provides essential knowledge for creating photorealistic environments, optimizing professional workflows while meeting client expectations efficiently and effectively.
Learning Outcomes
By completing this workshop, artists will have learned uniquely beneficial techniques for creating professional-quality 3D matte paintings and photorealistic environments.
Key skills include:
- How to seamlessly blend 2D and 3D elements for cohesive environmental compositions.
- How to utilize camera projection techniques for realistic depth and perspective integration.
- How to create and texture realistic terrains using advanced landscape generation in World Machine.
- How to composite multiple elements effectively using industry-standard software and techniques.
- How to achieve realistic lighting and shading across many assets in order to sell atmospheric environmental storytelling.
- How to optimize workflows for efficient client and team collaboration and project delivery.


