


Discover how to create a professional explosion shot in this 7.5-hour workshop with Ganesh Lakshmigandan, Senior FX Technical Director at Weta FX. From analyzing references to completing the final composite, Ganesh walks you through the entire creation process.
Ganesh demonstrates how to use the Axiom Solver (version 3.1 or higher) in Houdini 20 to create all the pyro simulations. He teaches every pro trick in the book to achieve a realistic-looking sim, including accurate shading and lighting.
Solaris/Karma XPU is used to shade, light, and render the shot. Ganesh reveals how to use the latest karma volume shader and take advantage of the latest features to achieve visually realistic-looking volume renders. In the final stage of the workshop, you’ll then tackle the Nuke composite of all the rendered elements.
Throughout this workshop, you will learn SOP tricks to create emitters and see how to split simulations to make art-directable elements quickly and efficiently. The GPU-based Axiom Solver with Karma XPU is a professional solution for creating faster iterations in both simulation and rendering.
The project files accompanying this workshop include the background asset courtesy of Enterables on CG Trader; Ganesh has also provided his own assets for subscribers to follow along with the tutorial.
32 Lessons
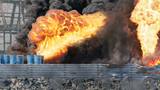
In this workshop, Ganesh Lakshmigandan dives into a layered approach to creating complex pyro effects by identifying which elements can be simulated separately and determining the correct order of execution. By breaking down a seemingly cohesive explosion into multiple interdependent simulations, artists can manage complexity more effectively across setup, simulation, shading, rendering, and compositing stages. This methodical workflow allows for greater control and more achievable results when recreating realistic fire and smoke effects.
Duration: 4m 55s

This lesson focuses on the essential work needed before running simulations in Houdini. By properly organizing assets through collections, creating appropriate collision volumes, and caching the data, the scene is set up for realistic physics interactions. Ganesh establishes this foundation to create the barrel explosion effect, utilizing the collision geometry prepared in this session.
Duration: 10m 22s

This lesson forms the basis for a controlled, semi-procedural foundation for creating a realistic barrel explosion effect by combining curve-based geometry with carefully tuned parameters and keyframe animation. By prioritizing matchability over pure proceduralism, this approach allows artists to closely replicate reference footage while retaining enough procedural variation to create organic, believable results. Ganesh completes the emitter setup here before transitioning into the pyro simulation phase.
Duration: 34m 26s

Ganesh establishes a sophisticated multi-layered emission system that mimics real world explosion behavior through carefully timed and grouped particle emitters. By separating trails into distinct groups with individual P-scale animations and adding directional burst sources for the initial explosion, the setup creates a realistic foundation for the pyro simulation. This methodical approach ensures precise control over the explosion's appearance and timing in subsequent simulation stages.
Duration: 21m 34s

This lesson covers the foundational simulation setup for creating a realistic explosion effect by systematically configuring the Axiom solver and testing parameters against reference footage. The important lesson is that matching reference requires careful balancing of interdependent parameters across timescales, dissipation, and buoyancy through repeated flipbook testing. Ganesh starts with a lower resolution initially and focuses on visualizing density rather than temperature to iterate toward the desired behavior.
Duration: 10m 6s

Proper explosion expansion depends heavily on carefully animated pressure and temperature emission values during the combustion phase. While the current setup shows improvement over the previous version, with basic expansion occurring, the simulation still appears somewhat static. Ganesh notes this limitation and explains that adding disturbance, turbulence, and directional forces in the upcoming lesson will create more dynamic shape changes.
Duration: 8m 10s

This lesson goes over the importance of proper node configuration and a layered approach to creating realistic explosion simulations. By systematically adding wind, turbulence, and speed-controlled disturbances at different scales, Ganesh shows how to break up unrealistic smooth shapes while maintaining the explosive's core characteristics.
Duration: 14m 44s

This lesson emphasizes the importance of layering multiple disturbance techniques at different scales while carefully controlling their intensity to create believable explosion effects. The core lesson is that adding detail isn't always better. Ganesh demonstrates how excessive confinement can destroy the structural integrity of the simulation and shows how time-based expressions can solve this. Working at lower resolutions for iteration while periodically checking full resolution ensures both efficiency and quality in the final result.
Duration: 14m 55s

This lesson focuses on the technical optimization required for high-quality explosion simulations rendered with Karma XPU. A crucial understanding is to match field resolutions and properly prepare simulation data through proxy caching and vector splitting to avoid rendering issues. Ganesh sets up the foundation for further refinement, including upcoming work on curve processing, duplication, and color variation.
Duration: 10m 9s

This lesson provides a systematic approach to creating dynamic, stylized curve-based effects in Houdini through layered attribute manipulation. By combining noise offsets, color temperature mapping, thickness variations, and time-based exposure controls, Ganesh demonstrates how this technique produces visually complex trail effects from simple curve geometry.
Duration: 15m 22s

The Pyrobate node is an essential preprocessing step for creating realistic explosions in Houdini, offering an efficient and art-directable alternative to expensive volume rendering methods. By generating scatter fields that simulate light interaction with smoke, artists can create convincing results in the viewport that will be further refined in Solaris using the Karma volume shader. Ganesh demonstrates how procedural data preparation can greatly improve both artistic control and rendering efficiency.
Duration: 10m 6s

The methodical approach to shader parameter adjustment, including density, scatter, fire, and color controls combined with expression-based animation, results in a professional-looking explosion with proper light interaction and temporal falloff. Ganesh highlights organization and proper asset hierarchy as foundational elements before diving into the detailed shader work.
Duration: 23m 24s

This lesson covers the technical workflow for integrating dynamic trail effects into an explosion sequence while maintaining proper render pass separation for compositing. The use of proxy volumes as phantom objects demonstrates an efficient method for capturing realistic lighting interactions between the explosion and environment, as explained by Ganesh.
Duration: 12m 58s

Ganesh provides a methodical approach to creating fire plume simulations by building complexity through multiple customized emitters rather than relying on a single source. This lesson emphasizes the importance of establishing foundation elements such as proper positioning, varied noise patterns, and appropriate force directions. This staged workflow allows for better control and more realistic results in the final fire simulation.
Duration: 15m 52s

This lesson demonstrates the process of refining simulation parameters to match reference footage of an explosion or fire effect. Ganesh highlights the physical reasoning behind parameter choices, particularly why temperature must exist throughout the simulation for proper smoke behavior, even though it will only be visible in specific areas.
Duration: 9m 17s

Ganesh emphasizes the importance of using control fields and speed-based masking to apply effects selectively rather than uniformly, which prevents common issues like excessive stretching. In the upcoming lessons, the interaction between the barrel explosion and smoke will be addressed to create a more cohesive pyro element.
Duration: 16m 54s

This lesson shows how practical VFX work often involves creating convincing illusions rather than perfect simulations. By strategically timing the interaction and using influence fields rather than velocity fields, Ganesh achieves a believable explosion-smoke effect that serves its purpose in the final shot.
Duration: 10m 40s

This lesson outlines an efficient VFX workflow by demonstrating how to strategically layer multiple simulations rather than creating a single complex simulation. By keeping simulations modular and applying optimization techniques, artists can achieve complex, realistic explosion effects while maintaining reasonable simulation times. Ganesh focuses on isolating temperature values and preparing the simulation for rendering in Solaris.
Duration: 12m 5s

Ganesh provides a practical process for controlling temperature visualization in Houdini simulations by isolating specific areas rather than displaying temperature everywhere. The technique uses VDB operations combined with carefully configured PyroRender settings to achieve visually interesting results. While the effect appears strong in the viewport, the final result will look appropriate once brought into the LOP context for rendering.
Duration: 12m 27s

Ganesh demonstrates professional practices, including organized node structures, systematic material assignment, and problem-solving approaches for software limitations. The lesson concludes by establishing a two-step simulation process for additional explosion elements, showing how complex VFX shots are built up incrementally.
Duration: 19m 12s

This lesson establishes the foundation for a complex pyro simulation by methodically setting up the emission source and applying multiple layers of noise to create realistic, organic fire movement. Ganesh utilizes an approach of iterating without collisions to allow for faster testing while tuning the fundamental shape and behavior. Future lessons will build upon this base by implementing combustion models and further shaping refinements.
Duration: 13m 36s

Ganesh demonstrates how to create a realistic combustion simulation with proper expansion and rising behavior through careful temperature and cooling management. The crucial takeaway is using height-based cooling controls to mimic real-world fire behavior where heat dissipates more rapidly at higher elevations. This lesson establishes a solid foundation that will be enhanced with additional turbulence and environmental effects.
Duration: 6m 45s

This lesson demonstrates a methodical approach to pyro simulation setup, emphasizing the importance of testing multiple parameter values through flipbook comparisons. Ganesh layers multiple disturbances at different scales, controlled by physical properties such as height and speed, to create realistic turbulence. The addition of a secondary emitter shows how, sometimes, the solution to shape problems is found by adding strategic source elements.
Duration: 16m 15s

This lesson covers the essential pre-production steps for complex smoke simulations in VFX work. By creating optimized proxy volumes for rendering and properly configured collision objects, Ganesh establishes the necessary foundation before executing the primary smoke simulation. This methodical approach of caching and organizing simulation data ensures better performance and more controlled results.
Duration: 3m 42s

This lesson demonstrates an advanced smoke simulation workflow that emphasizes layering multiple emission sources with distinct characteristics to create a complex, realistic effect. By strategically placing sources with varying properties around collision objects and using influence fields for directional control, Ganesh builds a foundation for heavy smoke simulation. The methodical approach of setting up sources individually before enabling collisions allows for efficient workflow optimization.
Duration: 26m 34s

This lesson covers how to build complex pyro simulations by isolating and testing individual emitters to understand their contributions. While the current low-resolution tests show "blobby" results, Ganesh highlights that combustion and shape settings will refine the simulation to produce a more realistic final result. The systematic testing approach emphasizes the importance of understanding each element's behavior before combining them.
Duration: 11m 11s

Ganesh highlights the importance of testing each addition through flipbook previews, showing how wind forces contain the smoke while disturbances and confinement add natural-looking detail. The workflow prepares the simulation for high-resolution rendering and subsequent post-processing, including density manipulation and volume shading.
Duration: 10m 10s

This lesson emphasizes the importance of layering multiple simulation elements with carefully tuned parameters and shaders to achieve photorealistic results. By separating pyro and smoke elements, appropriately masking temperature, and applying sophisticated density manipulation techniques, artists can maintain artistic control while achieving complex, naturalistic atmospheric effects. Ganesh uses a methodical approach, refining one element at a time and using precise numerical values to provide a replicable framework.
Duration: 28m 8s

Adding subtle atmospheric elements that enhance rather than distract from the main focal point of a shot demonstrates a professional approach in this lesson. This technical workflow shows how to properly prepare both emission sources and collision geometry in Houdini for pyro simulations.
Duration: 16m 43s

This lesson focuses on efficiently building a smoke simulation by optimizing the node network for performance and configuring detailed parameters for the Axiom solver. Ganesh explains that the current dense visualization is temporary, and the final rendered smoke will appear much more subtle once proper shading and lighting are applied. This represents a key step in the overall VFX pipeline before moving to compositing.
Duration: 9m 37s

By carefully separating elements into multiple render passes with proper holdouts and adding atmospheric effects like fog for depth, Ganesh shows how to maintain compositing flexibility while creating a polished final shot. Students learn the level of craft required for professional visual effects work.
Duration: 16m 35s

This final lesson demonstrates a practical, artist-friendly approach to compositing complex explosion VFX shots. While the instructor acknowledges that professional compositors might use more sophisticated methods, Ganesh highlights techniques that are effective for solo VFX artists working with limited resources. The emphasis on subtlety successfully bridges the gap between CG elements and photorealistic footage, proving that thoughtful compositing can significantly enhance render quality.
Duration: 17m 59s

Primary tools
For this workshop you’ll need:
Project Files
When you download the workshop files, you'll get access to Ganesh Lakshmigandan's project files to help with creating a barrel explosion using Houdini. Inside, you'll find:
- 3DS project files (.3ds) – The original 3D scene files you can open and edit
- 3D models (.fbx, .obj) - Assets that are used in the Houdini file
- High-quality textures (.png) - Textures that are used as references during the workshop
Skills Covered
Who’s this Workshop for?
This workshop is designed for intermediate to advanced VFX artists, FX technical directors, and Houdini users who want to take their explosion effects to the next level. Artists with foundational Houdini knowledge and pyro simulation experience will gain the most from Ganesh Lakshmigandan's advanced techniques and production-proven workflows.
Pipeline TDs, compositors, and lighting artists working in feature film or high-end commercial production will also discover valuable insights throughout this training. The workshop delivers industry-standard methods for creating highly art-directable explosions using cutting-edge GPU technology, making it an essential step for artists aiming to produce cinematic, professional-quality destruction effects.
Learning Outcomes
By the end of this workshop, artists will have mastered the pipeline for creating photorealistic explosion effects using industry-standard tools and professional workflows.
Key skills include:
- How to analyze reference material and plan explosion simulations for maximum visual impact.
- How to utilize Houdini's Axiom Solver effectively for GPU-accelerated pyro simulation workflows.
- How to create efficient SOP-based emitters and split simulations for art-directable elements.
- How to shade and light volume effects using Solaris and Karma XPU rendering.
- How to optimize Karma volume shaders for realistic explosion appearance and faster iterations.
- How to composite multiple rendered elements seamlessly in Nuke for final shot delivery.
- How to implement professional tricks for achieving believable explosion dynamics and behaviors.
- How to leverage GPU technology for faster simulation and rendering iteration cycles.


