


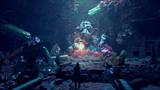


Discover the complete process that goes into executing an epic water simulation shot featuring a sea creature breaching out of the ocean and diving back in. This comprehensive workshop, taught by CG Supervisor Miguel Perez Senent, begins by defining a large ocean surface and then showcasing Houdini’s latest water toolset to simulate interaction with the creature. Using the latest FLIP Solver, you will create the base fluid simulation and dive into tips and tricks to make it more realistic and efficient. You’ll then learn how to generate and blend the mesh of the fluid with the rest of the ocean using some clever techniques and discover how to use the result to define a custom whitewater emission source based on the mesh surface properties and physical characteristics.
The simulation of realistic whitewater poses significant challenges, especially at large scales. Over the course of several lessons, you’ll explore a range of techniques to achieve realistic motion, from simulating an airfield to modifying the dynamics of millions of particles using various methods based on real-life observations to mimic the behavior of water at different densities. Finally, you will look-dev and render the shot using Karma within the Solaris USD context, making sure each component of the water is tightly integrated. By splitting the various necessary passes, you can easily put together a final comp using Nuke.
Throughout the workshop, you will learn to keep your scene efficient in order to be able to create the shot with a single computer. Notably, the showcased FLIP and whitewater simulations at the final resolution took under 1 hour to run. Through the power of TOPs, you’ll unlock the ability to wedge and parallelize simulations and renders.
Even though this workshop covers some advanced topics and techniques, following along without prior experience will get you to the end result. Included with this workshop are the materials needed to fully create the FX shot, including the animated creature with textures, light, and camera.
18 Lessons
In this workshop, Miguel Perez Senent provides a complete guide to creating professional-quality water effects in Houdini. From simulation setup to final compositing, he walks through a full shot featuring creature-water interaction, teaching industry-standard techniques for large-scale water simulations, whitewater generation, and combining multiple simulation elements to achieve realistic, cinematic water effects.
Duration: 2m 45s

In this lesson, Miguel demonstrates a production-ready workflow for creating an optimized ocean surface in Houdini. By strategically allocating geometric detail only where the camera can see it and splitting frequency data between geometry and shaders, the setup balances visual quality with computational efficiency. The comprehensive caching strategy ensures that expensive calculations are performed once and reused, making this approach practical for production environments.
Duration: 30m 33s

This lesson presents techniques for creating large-scale FLIP simulations efficiently. By combining density-based particle management, strategic force modulation, and aggressive performance optimizations, Miguel shows how to achieve high-quality water splashing effects without excessive computation time or storage requirements.
Duration: 39m 20s

In this lesson, Miguel demonstrates professional-level optimization techniques essential for production-scale fluid simulations. The inverse deformation workflow elegantly solves the ocean deformation challenge without the computational overhead of guided simulations, while the comprehensive compression pipeline makes caching 400 frames feasible by reducing file sizes by nearly 90%. These techniques save disk space and improve I/O performance, ultimately speeding up the entire simulation workflow.
Duration: 25m 4s

This lesson showcases advanced FLIP simulation workflow optimization, focusing on creating production-ready water meshes efficiently. Miguel highlights how mesh quality comes not just from simulation resolution, but from intelligent post-processing, using adaptive particle scaling, velocity-based smoothing, and strategic geometry removal. The dual-cache Python scripting technique exemplifies production efficiency, avoiding redundant calculations while maintaining proper data separation for downstream whitewater simulation.
Duration: 44m 48s

In this lesson, Miguel establishes a workflow for realistic whitewater effects by creating an air simulation that captures the natural turbulent motion created by the creature in his scene and water interactions. By using actual simulated velocity fields rather than procedural noise, the final whitewater exhibits more organic, believable behavior.
Duration: 22m 23s

This lesson goes over a sophisticated custom approach to white water emission that prioritizes visual coherence between the water surface and particle effects. By calculating emission based on physical metrics (curvature, vorticity, and kinetic energy) and optimizing the data pipeline, Miguel creates an efficient system that captures the appropriate regions for white water generation while avoiding common rendering artifacts.
Duration: 17m 42s

In this lesson, Miguel showcases a procedural approach to generating detailed white water particle sources from low-resolution FLIP simulations. By combining velocity manipulation, generation based on particle speed, and structure-enhancing techniques like attribute blur, the process transforms simple particle blobs into realistic, highly detailed water spray sources.
Duration: 13m 51s

This lesson presents an advanced technique for creating realistic large-scale whitewater simulations by building a custom particle solver with density-aware physics. Here, Miguel focuses on making air resistance and gravity dependent on local particle density, which creates the characteristic behavior of water splashes where dense clusters travel ballistically, while sparse particles create floating, misty trails affected by air turbulence. This approach achieves visually convincing results more efficiently than traditional methods.
Duration: 16m 18s

In this lesson, Miguel completes his whitewater solver by addressing three critical interaction systems. The combination of density management, FLIP surface dynamics, and physically-based creature collision creates realistic spray, foam, and mist effects. The next phase will focus on efficient caching strategies and wedging techniques to handle the large simulation scale required for the full shot.
Duration: 26m 45s

In this lesson, Miguel shares his workflow for managing large-scale simulations through spatial division and optimization. By combining wedging strategies, point culling, and controlled caching through TOP networks, he demonstrates how to make memory-intensive simulations feasible. The workflow remains open-ended as additional water emission from the creature in his scene will be added before executing the final cache.
Duration: 16m 39s

In this lesson, Miguel finishes his pre-simulation setup by adding physically plausible dripping water effects that complement the main whitewater simulation. By intelligently targeting emission areas based on geometry characteristics and implementing time-based decay, he creates a realistic effect of water gradually dripping off the creature after it emerges.
Duration: 17m 55s

In this lesson, Miguel walks through the essential setup for rendering a complex ocean VFX shot. He emphasizes optimizing workflow by separating static background elements from interactive foreground simulations. Miguel demonstrates how to create physically accurate water materials while managing computational costs, using techniques like temporarily disabling expensive displacement calculations to iterate quickly on shading and lighting before committing to final high-quality renders.
Duration: 22m 47s

In this lesson, Miguel demonstrates a comprehensive approach to creating production-quality water shaders that balance visual realism with computational efficiency. By combining procedural noise techniques, simulation attributes (vorticity, curvature, velocity), and strategic geometry management, Miguel creates a water surface that transitions naturally between calm reflective areas, foam patches, and turbulent splashes.
Duration: 25m 14s

In this lesson, Miguel focuses on the whitewater in the simulation. By baking motion blur into the volume, applying camera-aware velocity compensation, and carefully controlling particle density over their lifespans, he achieves realistic results without costly volume scattering. His shader tweaks, like opacity-biased reflections and colored shadows, show how selectively bending physical accuracy can produce more visually appealing results while still feeling natural.
Duration: 28m 42s

In this lesson, Miguel walks through his rendering setup, demonstrating professional practices for complex multi-element scenes. By carefully organizing render passes, optimizing geometry settings for each pass's specific needs, and implementing efficient batch rendering through TOPs, he creates a flexible pipeline that balances render quality with production efficiency. The strategic use of AOVs and separate passes provides maximum control in compositing.
Duration: 30m 30s

In this lesson, Miguel provides a Nuke compositing tutorial, showing how he merges multiple render passes into a single, cinematic image. His workflow demonstrates how careful layering, from basic depth integration to subtle lens effects, can turn separate render passes into a polished, production-ready shot.
Duration: 25m 30s

In this final chapter, Miguel reviews his work and reflects on adjustments he might make if starting over. He emphasizes knowing when to stop, while acknowledging that production-quality shots often require massive caches and multi-hour frame renders, and that achieving the perfect result may take multiple attempts. His insights highlight the iterative nature of high-end VFX, balancing technical quality with practical resource constraints, and offering valuable lessons for artists tackling complex simulations.
Duration: 6m 5s

Primary tools
For this workshop you’ll need:
Project Files
By downloading these files, you'll gain access to the assets Miguel Perez Senent used in this workshop, allowing you to follow along with his lessons. Included in the package are:
- USD scene files (.usd) – Ready-to-use assets across the full project that can be imported into most 3D applications
- Texture maps (.exr, .tif) - High-resolution displacement, height, diffuse, roughness, and subsurface scattering textures for all your texturing needs
- HDRI lighting (.exr) - An environment map for realistic lighting and reflections in your 3D scenes
Skills Covered
Who’s this Workshop for?
This workshop is designed for intermediate to advanced Houdini artists and VFX professionals working in film, television, or games interested in water simulation techniques. 3D generalists and students interested in Houdini-based workflows will also find these comprehensive lessons to be valuable for developing their skills.
The workshop provides practical, production-ready techniques that can be applied immediately to professional projects, making it ideal for anyone looking to elevate their water FX skills and workflow efficiency. Artists with basic Houdini knowledge who are ready to tackle more complex simulations will have an easier time getting used to the processes shown in these lessons.
Learning Outcomes
By completing this workshop, artists will have mastered the complete pipeline for creating photorealistic large-scale water simulations with creature interactions in Houdini.
Key skills include:
- How to set up and optimize FLIP solver simulations for large-scale ocean environments.
- How to create realistic creature-water interactions using Houdini's latest toolset effectively.
- How to generate and blend fluid meshes with ocean surfaces using advanced techniques.
- How to develop custom whitewater emission sources based on surface properties and physics.
- How to simulate realistic whitewater behavior at scale using airfield and particle dynamics.
- How to render water simulations efficiently using Karma within the Solaris USD workflow.
- How to optimize scene efficiency and leverage TOPs for parallel simulation processing.
- How to composite multi-pass water renders for final production-quality shot assembly.


